Using Threads in Django
Backend services are comprised of several components, one of which is background tasks. Background tasks allow some processes to be executed ‘behind the scenes’ due to some reasons which may include its execution time or how data-intensive it is among others. There are a lot of use cases for background tasks - which is outside the scope of this discussion. In implementing background tasks in Python, I usually go with queueing libraries like celery; using RabbitMQ as the message broker. With this approach, I can persist the workers’ task results in the database. However, another approach is to explicitly spawn a daemon thread to execute a task. Both approaches have their own advantages and disadvantages.
Let’s explore the thread approach. As opposed to a piece that explains a technical concept in some amount of detail, this post is a follow-along demo on using threads in a simple Django project that allows for bulk book data upload from an excel or csv file. You can navigate the post via the Table of Contents. Let’s dive right into it.
project setup
prerequisites:
- Basic knowledge of Linux commands
- Have Python 3 installed
- Knowledge of Python
- Some knowledge of Django and Django REST
NB: This piece does not explain Django concepts
creating the project structure
Before getting into some code let’s set up the project’s structure and get the basic ‘house-keeping’ stuff out of the way.
The final project structure would look like this:
proj
├── app
│   ├── __init__.py
│   ├── admin.py
│   ├── apps.py
│   ├── migrations
│   │   ├── __init__.py
│   ├── models.py
│   ├── serializer.py
│   ├── tests.py
│   ├── urls.py
│   └── views.py
├── db.sqlite3
├── manage.py
└── proj
    ├── __init__.py
    ├── asgi.py
    ├── settings.py
    ├── urls.py
    └── wsgi.py
Create a new directory and then cd into that directory.
Now we create a Python virtual environment in which all packages installed will be kept using the command: python3 -m venv env.
We then activate the virtual environment and install the required packages using the pip command via the terminal like so:
   source env/bin/activate

   pip install django
   pip install djangorestframework
   pip install numpy
   pip install pandas
   pip install openpyxl
We now create a Django project and an app using the commands below. Replace proj and app with your desired project and app names respectively:
    django-admin startproject proj
    cd proj
    django-admin startapp app
Let’s add the rest framework we installed and the app we created to INSTALLED_APPS in proj/settings.py like so:
   INSTALLED_APPS = [
    ... ,

    'rest_framework',
    'app',
]
Now to confirm if our setup is right, we start the server in the proj directory using the command below:
python manage.py runserver
If the server starts correctly, you’re on the right track! You will see a warning in the terminal saying you have a given number of unapplied migrations, don’t worry about that - we’ll get that sorted shortly.
modeling a book
Since this mini project demos a bulk upload of book data from either a csv or excel sheet to a database, let’s model a book in app/models.py:
    # app/models.py

    from django.db import models
    # Create your models here.

    class Book(models.Model):
        title = models.CharField(max_length=255)
        author = models.CharField(max_length=100)
        book_type = models.CharField(
            max_length=140,
            choices=(
                ('Sci-tech', 'Sci-tech'),
                ('Magazine', 'Magazine'),
                ('Comic', 'Comic'),
                ('Classic', 'Classic'),
                ('Horror', 'Horror'),
            )
        )
        ISBN = models.CharField(max_length=255)
        year_published = models.CharField(max_length=4)
        price = models.DecimalField(decimal_places=2, max_digits=10)
        no_of_pages = models.PositiveIntegerField(blank=True, null=True)
        quantity = models.PositiveIntegerField()
        description = models.TextField(blank=True, null=True)

        def __str__(self):
            return self.title
To be able to view the model and its data in Django’s admin panel, we register the model in app/admin.py like so:
    # app/admin.py

    from django.contrib import admin
    from .models import Book

    # Register your models here.
    admin.site.register(Book)
creating a serializer
Django REST framework has a concept of serializers, which according to the official docs, “allow complex data such as querysets and model instances to be converted to native Python datatypes that can then be easily rendered into JSON, XML or other content types. Serializers also provide deserialization, allowing parsed data to be converted back into complex types, after first validating the incoming data.” With that explained, let’s create a serializer.py file within the app directory:
    # app/serializer.py

   from rest_framework import serializers
   from .models import Book

    class BookSerializer(serializers.ModelSerializer):
        class Meta:
            model = Book
            fields = '__all__' # serialize all fields
That’s it for the serializer.
creating a simple viewset
The threading will be implemented in app/views.py but for now, let’s implement a simple viewset and after that route it to an endpoint to make sure the setup works as expected. So, in app/views.py:
# app/views.py

from django.shortcuts import render
from rest_framework import viewsets, status
from rest_framework.response import Response

# Create your views here.

class UploadViewSet(viewsets.ViewSet):
    def upload(self, request):
        if request.data.get("message") == "healthcheck":
            return Response(
                    {"reponse": "It works!"},
                    status=status.HTTP_200_OK
                )
setting up the routes
Next, let’s set up the routes for proj and app.
In proj/urls.py we add the url pattern for app in the urlpatterns list as shown below:
# proj/urls.py

from django.contrib import admin
from django.urls import path, include # new import

urlpatterns = [
    path('admin/', admin.site.urls),
    path('api/v1/', include('app.urls')), # include app's url pattern
]
We then create a urls.py file in the app directory - app/urls.py - where we define and register the route(s) for app using Django REST framework’s DefaultRouter.
# app/urls.py

from django.contrib import admin
from django.urls import path, include
from .views import UploadViewSet
from rest_framework import routers

router = routers.DefaultRouter()
router.register('upload', UploadViewSet, basename='Upload')

urlpatterns = [
    path('', include(router.urls)),

    path('upload', UploadViewSet.as_view({
        'post': 'upload',
    })),
]
Next, we run the server and test the endpoint.
running the server
While in the proj directory, execute these commands to run the default django migrations and create a super user with your desired credentials.
   python manage.py makemigrations
   python manage.py migrate

   python manage.py createsuperuser
Now execute the runserver command as shown below to start the server:
python manage.py runserver
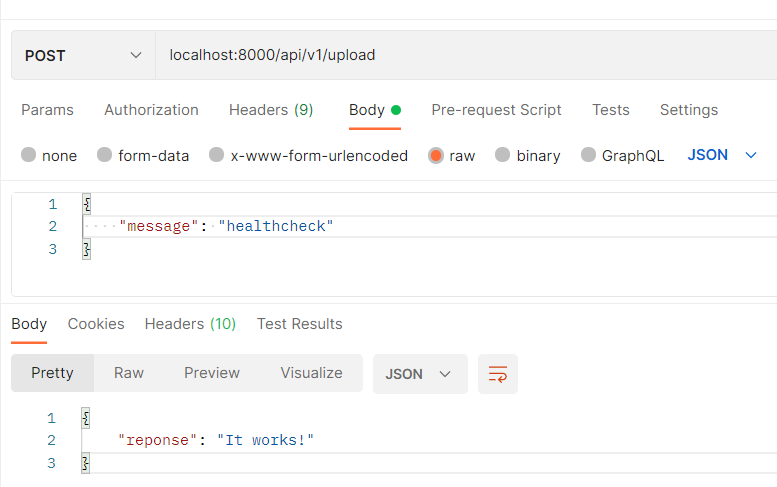
We then test the endpoint to make sure it is up and running. We send a post request to the endpoint and expect to recieve a response:
 |
|---|
| testing the endpoint |
thread implementation of books upload
Now we implement the upload process using threading in app/views.py and therefore the file is rewritten as shown below:
# app/views.py

from django.shortcuts import render
from rest_framework import viewsets, status
from rest_framework.response import Response

# new imports
import threading
import numpy as np
import pandas as pd
import logging
logger = logging.getLogger(__name__)

from .serializer import BookSerializer
from django.db import transaction


# Create your views here.


class UploadViewSet(viewsets.ViewSet):

    # ensure atomic transaction
    @transaction.atomic
    def upload(self, request):

        """entry method that handles the upload request"""

        try:
            logger.debug("Upload request received ...")

            request_file = request.data.get("books")

            if request_file:
                logger.debug("File Detected")
            else:
                return Response(
                    {"response": "No file received"},
                    status=status.HTTP_400_BAD_REQUEST
                )

            # read request file using the appropriate
            # pandas method based on file extension check

            if "xls" in str(request_file).split(".")[-1]:
                file_obj = pd.read_excel(request_file)
            elif "csv" in str(request_file).split(".")[-1]:
                file_obj = pd.read_csv(request_file)
            else:
                return Response(
                    {"response": "Invalid File Format"},
                    status=status.HTTP_400_BAD_REQUEST,
                )

            # convert file obj to a dataframe,
            # handle empty rows and
            # convert the dataframe to a list of dictionaries

            books_df = pd.DataFrame(file_obj)
            books_df = books_df.replace(np.nan, "", regex=True)
            books = books_df.to_dict(orient="records")

            # instantiate and start thread with required params
            t = threading.Thread(
                target=self.execute_upload,
                args=[books],
                daemon=True
            )
            t.start()

            return Response(
                {"response": "Upload Initiated, Check Book Table"},
                status=status.HTTP_201_CREATED,
            )
        except Exception as e:
            logger.error(f"Error Uploading File. Cause: {str(e)}")
            return Response(
                {
                    "response": f"""Error Uploading File.
                                             Cause: {str(e)}"""
                },
                status=status.HTTP_400_BAD_REQUEST,
            )

    def execute_upload(self, books):

        """
        the method that executes the book data upload
        :param books - dict
        """

        try:
            logger.debug("Within the execute_upload() method")

            for book in books:
                try:
                    # serialize and save book data
                    serializer = BookSerializer(data=book)
                    serializer.is_valid(raise_exception=True)
                    serializer.save()

                    logger.debug(
                        f"Successfully inserted {book['title']}"
                    )
                except Exception as e:
                    logger.error(f"Error Inserting Book. Cause: {str(e)}")
        except Exception as e:
            logger.error(f"Error During Upload. Cause: {str(e)}")
Let’s talk about the code in app/views.py. First off, the necessary imports are made, then in the UploadViewSet, the upload method is the entry method that handles the incoming request. It has a decorator - @transaction.atomic - that ensures an atomic transaction. When the request is received, the file extension is checked, after which the file data is read using the appropriate pandas method and then the data read from the file is converted to a list of dictionaries.
A thread is instantiated and started with the target parameter value set to execute_upload method (notice how the method name is passed without brackets), the args parameter, which is the argument(s) to be passed to the execute upload method when invoked, is set to books (a list of book data) and a boolean param, daemon, set to True. The daemon parameter which indicates whether the thread is a daemon thread or not. The main thread is not a daemon thread and therefore all threads created in the main thread default to daemon=False. A daemon thread does not block the main thread from exiting and it continues to run in the background while the appropriate response to the request is returned by the main thread.
When the thread invokes execute_upload, each book data is serialized and then saved in the database.
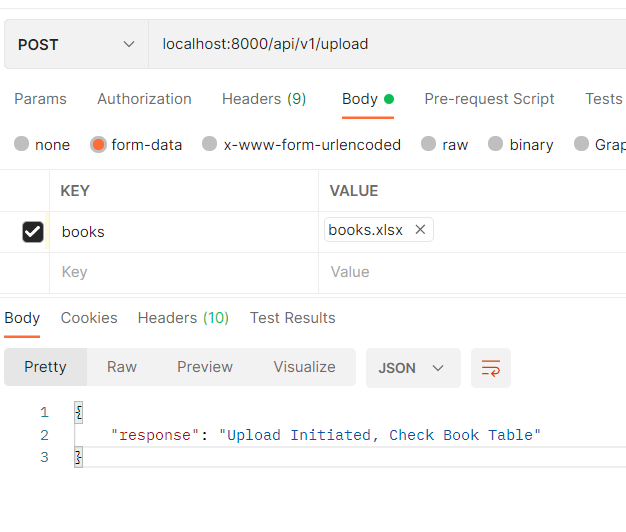
Sample book data in an excel/csv file as shown below is sent as a post request to the endpoint which returns an almost immediate response while the database is being populated with the book data by the daemon thread.
 |
|---|
| sample book data in excel/csv file |
An image for the file request via Postman is shown below:
 |
|---|
| file request via postman |
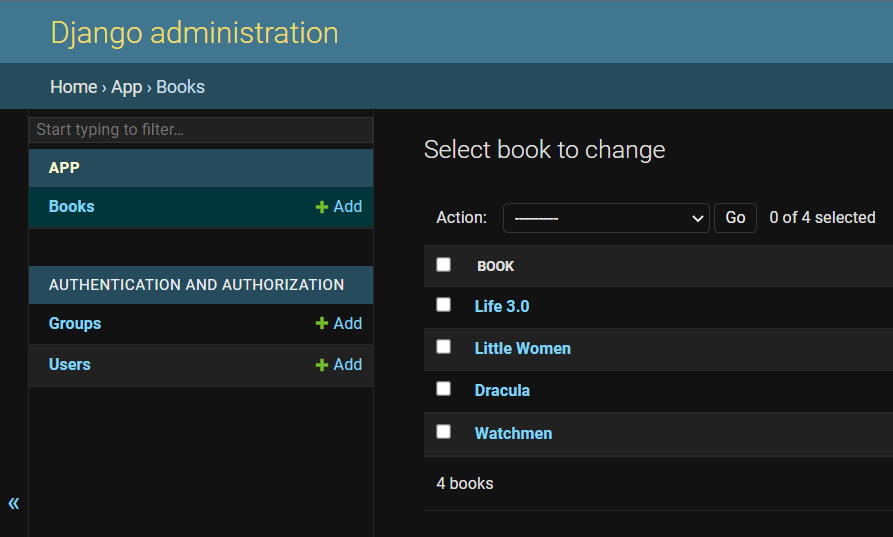
Finally, a Django admin view of the uploaded book data:
 |
|---|
| django admin view of uploaded data |
conclusion
In conclusion, background tasks are inevitable in backend services but rather than using a third-party job queue like celery for all background tasks which can introduce additional queueing delays, based on the specific use case, some tasks can simply be executed using daemon threads.
The source code for this post is available on Github